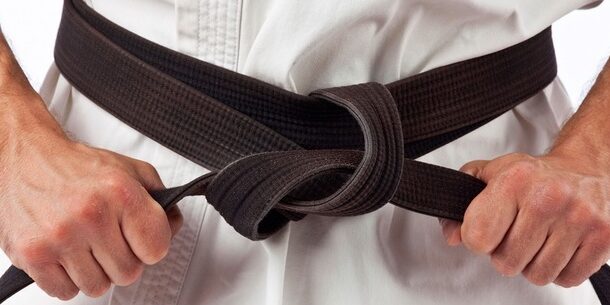
When new students first arrive at the dojo, and get their first gi (uniform), one of the first questions they ask is:
“How do you tie the belt?”
There are a few different ways, in fact, but in this post we’re going to talk about the most common way we tie the belt (or obi, in Japanese) — and why it matters that the belt is tied correctly. We’ll also look briefly at how to correctly fold your gi after training, or after it’s been washed.
It’s incredibly important that students wear their gi and obi correctly when they attend class. A messy gi or poorly-tied belt is not acceptable. Similarly, although students are not required to wear a t-shirt under their gi jacket, if they choose to, it must be a black t-shirt, ideally one of our black dojo t-shirts.
The reason for this is simple: Karate requires a mindset of doing everything to the best of your ability.
Every time we enter the dojo, whether we’re a child or an adult, whether we’re a white belt or a black belt, our goal is to make the most of our training — to learn as much as we can, to work as hard as we can. This can only be accomplished by paying attention to the details, and this requires a good mindset.
A gi that is wrinkled or dirty, a belt that’s poorly tied, or a bright colored t-shirt popping out from underneath the jacket — these are all signs of a poor mindset; a lack of attention to detail.
Think of your gi and your belt as the tools of your craft. Painters have their brushes, chefs have their knives, carpenters have their tools… and we have our gi and our obi. How we treat them is a reflection of how we approach our training, and treating them poorly is not a welcome attitude in the dojo.
The next time you’re in the dojo and there’s a class in session, pay attention to how the students appear and behave. The way a student approaches little things — like a neat gi and belt, like bowing into the dojo correctly — usually tells you exactly how seriously they’re going to take the rest of their training. In short, no matter how big or small the action, we want to do it to the best of our ability, because that’s the core philosophy of the martial arts, and its one of the simplest “life lessons” we should be taking from our training.
Finally, as a note to parents: Young children need this lesson modeled for them through your actions too. If you help them get dressed into their gi, if you help them tie their belt, make a point of doing it well. Make a point of being their partner and their guide toward this mindset of effort, cleanliness, and respect. Please do not send them to the dojo missing parts of their gi or without their belt, or with a colorful t-shirt on, or with a dirty uniform or poorly tied belt. It may not seem like it, but these behaviors are also teaching your kids a lesson — likely a lesson you didn’t intend, and certainly a lesson that is not appropriate or acceptable at the dojo. Your partnership in their martial arts education is essential.
Tying Your Obi (Belt)
 Step 1: Fold your belt neatly in half. Then unfold it, keeping ahold of the center, and place the center just below your belly button.
The tips of your belt should touch when you fold the belt in half. After you’ve unfolded it, the belt should sit on, or just above, your hips. This should also place the belt on top of your gi pants.
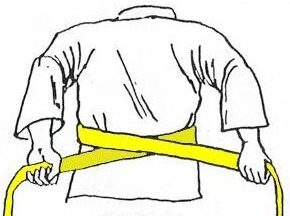 Step 2: Wrap both ends of the belt behind your back, and then neatly back in front.
The belt should still be an even length on both sides. Be careful the belt isn’t twisted, but lying flat all the way around.
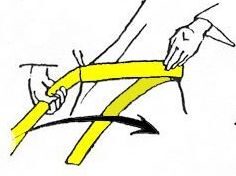 Step 3: Place the right side of the belt over the left (making an X)
“Left over right” if you’re tying someone else’s belt.
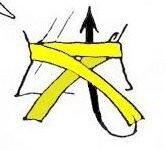 Step 4: Loop the right tip of the belt underneath the entire belt, and pull it through the top.
The tip of the belt should go under the part of the belt touching the body.
 Step 5: Place the left side of the belt over the right (making an X)
“Right over left” if you’re tying someone else’s belt.
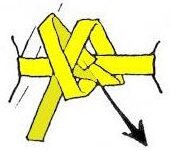 Step 6: Loop the left tip of the belt through the center hole, like tying a shoe.
This time, the tip of the belt does not go inside the part of the belt touching the body.
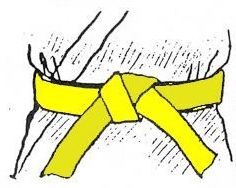 Step 7: To finish the knot of the belt, pull both tips down and out in a sharp motion.
Both tips of the belt should be even, and hang down toward the legs. If one end of the belt is pointing up or to the side, the tips were not pulled down correctly in this final step.
Folding Your Gi (Uniform)
 Step 1: Lay the jacket out flat, and remove any wrinkles or creases.
Line the lapels up so that the skirt of the jacket is even at the bottom, and make sure the sleeves are straight to the side. Spread out any wrinkles.
![]() Step 2: Fold the pants in half vertically, so the pant legs are neatly one over the other. Place the pants down the center of the jacket.
Step 2: Fold the pants in half vertically, so the pant legs are neatly one over the other. Place the pants down the center of the jacket.
Tuck the gusset/crotch of the pants inside the fold of the pant legs. Spread out any wrinkles.
 Step 3: Fold from the right shoulder to the left edge of the collar.
Use the seam of the sleeve at the shoulder and line it up with the far edge of the collar, and make sure the jacket fold is straight all the way down to the bottom. Spread out any wrinkles.
 Step 4: Fold the sleeve back in on itself, and then forward again.
Fold the sleeve neatly like an accordion, until it sits uniformly over the fold of the shoulder. Spread out any wrinkles.
 Step 5: Fold from the left shoulder to the right edge of the collar.
Use the seam of the sleeve at the shoulder and line it up with the far edge of the collar, and make sure the jacket fold is straight all the way down to the bottom. Spread out any wrinkles.
 Step 6: Fold the sleeve back in on itself, and then forward again.
Fold the sleeve neatly like an accordion, until it sits uniformly over the fold of the shoulder. Spread out any wrinkles.
![]() Step 7: Fold the bottom third of the gi jacket upward.
Step 7: Fold the bottom third of the gi jacket upward.
Make sure the skirt stays neat and doesn’t splay out once you’ve folded it. Spread out any wrinkles.
![]() Step 8: Fold the top third of the gi jacket downward, creating a square fold.
Step 8: Fold the top third of the gi jacket downward, creating a square fold.
The back of the gi should be facing up. Spread out any wrinkles.

